
Introduction to Recessed Downlight Installation
Recessed downlights are a fantastic way to add a modern and clean look to any room. They provide excellent lighting without taking up any visual space. Whether you’re renovating your home or just updating a specific room, installing recessed downlights is a great project to undertake. In this guide, we’ll walk you through the basics of recessed downlight installation.

Preparing for Installation
Before you start installing your recessed downlights, it’s essential to gather all the necessary tools and materials. You’ll need a tape measure, a pencil, a hole saw, a screwdriver, and the downlight kit. Make sure to turn off the power at the circuit breaker to ensure safety during installation. You should make sure that you reserve openings in the ceiling, arrange the lighting, ensure that the lighting is installed faster, save time.
Installation Steps
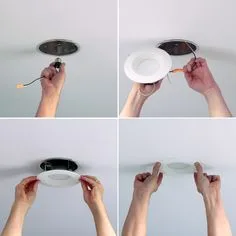 First of all, according to the position of the reserved mark, use the tool to cut, ensure that the size is appropriate, otherwise it is not stable enough after installation, so that you need to take out the lamp, first put the downlight driver into the ceiling, connect the power cord, pay attention not to turn on the power, and then according to the manufacturer’s instructions to align the lamp to the hole, press the bay, and plug the lamp into the hole. After the installation is completed, check to ensure that it is firm, and then turn on the power to check whether it can emit light normally, so that the installation of the downlight is completed, which is very simple and easy to operate.
Conclusion
Installing recessed downlights can transform any room, offering improved lighting and a sleek, modern appearance. By following this guide, you can successfully complete your recessed downlight installation project. Happy lighting!